Proxmox cloud backup
Table of Contents
If you are running Proxmox Virtual Environment [0] in your infra, chances are that you utilize the Backup and Restore functionality [1]. Like many other PVE features, its web GUI is devoid of a large number of controls for managing options described in the documentation.
Within this short entry I want to demonstrate setup I’ve came up with for synchronizing Proxmox VMs/CTs to Backblaze B2 cloud backup using hook scripts feature.
#
Prerequisites
Before proceeding, you should be in control of a Backblaze B2 account [2] with a configured bucket to upload dumps to. Alternatively, you should be fine using any other remote storage provided supported by rclone [3]. My choice of Backblaze is justified by the affordable pricing model they employ.
I’m also assuming that you have a configured backup job in PVE. Specifics don’t matter; the job can cover any number of machines, have whichever schedule and use any other options. A single backup job is tied to a single storage device for storing resulting dumps, so we can be sure all backups will be kept in the same location.
#
Backup job hook scripts
Hook script [4], in terms of PVE’s backups functionality, is an optional script set per job called at various phases of its execution. An example Perl script provided with pve-manager documentation enumerates the phases script might be called at:
job-start
job-end
job-abort
backup-start
backup-end
backup-abort
log-end
pre-stop
pre-restart
post-restart
The phase is passed to the script as the parameter.
#
rclone
We’re on the right track with integrating custom processes into PVE backup jobs. Let’s focus on preparing the process itself before hooking it up to the job.
Assuming that you’ve already created a Backblaze bucket, you should be in possession of API key and secret key.
Install rclone on the machine running PVE instance and run rclone config. Use the interactive prompt to configure the access to the bucket. Try running commands like rclone ls <bucket-name>: and rclone copy <sample-file> <bucket-name>: to verify if it works correctly. rclone should be capable of both reading and writing files.
#
Preparing the sync script
The script should run only after the backup job is entirely finished. Make sure the job is configured in Datacenter > Backup tab, then SSH into the server.
Create a new file in a directory convenient for you. Then, paste in the following content:
#!/bin/bash

if [ "$1" == "job-end" ]; then
    rclone --config /root/.config/rclone/rclone.conf --min-age 2w delete <bucket-name>:<bucket-path>
    rclone --config /root/.config/rclone/rclone.conf copy <storage-path> <bucket-name>:<bucket-path>
fi
if [ "$1" == "job-end" ] is the script entrypoint safeguard. The script will be called on multiple stages of the execution of any backup job, but sync should only happen after it’s finished.
All rclone commands are appended with --config option followed by the config file location. In my case, rclone would fail to locate the config file when called by cron.
First command, delete with --min-age option is my simple approach to implementing backups rotation mechanism. You can replace the value of 2 weeks with a retention time that suits you. Alternatively, you can apply lifecycle rules[5] to the bucket, so that the files will be purged automatically after specified period of time.
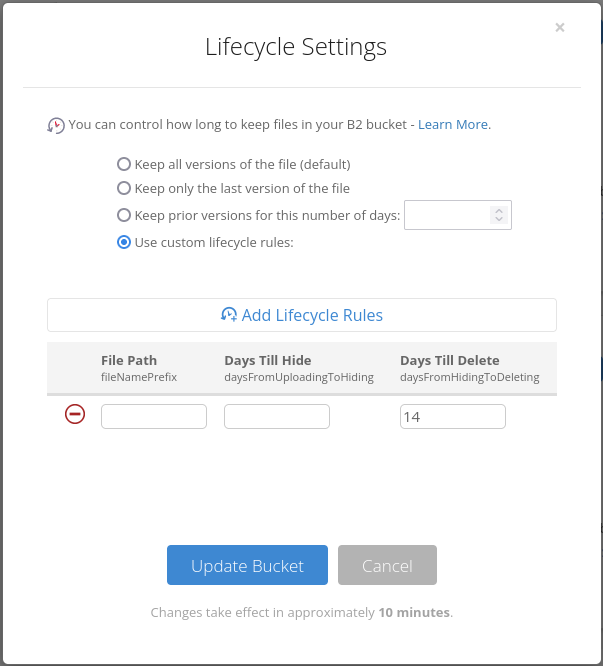
Pay attention to the `hard_delete` option in the `rclone` config of your B2 bucket. By default, it is set to `false` and the wizard prompts you about it during the configuration setup. If the bucket lifecycle policy is **not** set to *Keep only the last version of the file*, `rclone delete` will not in fact delete a file from the bucket. Instead, it is going to hide the file[6] with the hide marker.
Hidden files consume storage space and you are charged for them. By default, B2 buckets keep all revisions of the file.
Second command, copy, actually synchronizes content of the <storage-path> with <bucket-path> of the bucket denoted by <bucket-name>.
Replace the script with the actual path of backup dumps location and target bucket name, then edit /etc/pve/vzdump.cron file.
Warning in the heading comment can be safely ignored. Making changes to the job using web front-end writes changes directly to this file. We will be adding the option that is not possible to add with the GUI. Any further changes made to the job using the GUI won’t affect it.
Find the line responsible for scheduling the backup job of your choice and add the option --script <path-to-script> with a path to the script you’ve just created. For example:
30 3 * * 7 root vzdump 100 --quiet 1 --mode snapshot --script /root/b2-sync.sh --node node-0 --storage vms-storage --compress ztsd --mailnotification always
#
What’s next?
You’ve just configured Proxmox backup dumps synchronization with off-site cloud storage hooked with to the backup job finish. If you want to take this setup to the next level, try implementing complex backup retention rules. For example, desired rotation strategy would be:
- keep the latest 14 daily dumps,
- keep the latest 8 weekly dumps, etc.
#
Links
[0]: https://www.proxmox.com/en/proxmox-ve
[1]: https://pve.proxmox.com/wiki/Backup_and_Restore
[2]: https://www.backblaze.com/b2/cloud-storage.html
[3]: https://rclone.org/#providers
[4]: https://pve.proxmox.com/wiki/Backup_and_Restore#_hook_scripts
[5]: https://www.backblaze.com/b2/docs/file_versions.html
[6]: https://www.backblaze.com/b2/docs/b2_hide_file.html